1. 概述
在早起的ES版本中,我是说6.2版本之前,ES的安全功能是需要额外安装插件的,也就是我们熟知的x-pack,需要通过elasticsearch-plugin install的方式来安装。在6.2版本之后,官方把这个功能整合进了ES,我们可以通过配置文件直接开启,而不需要额外安装plugin了。在官方文档中,也在标题部分抹去了x-pack的痕迹,而全部都叫做安全功能(SIEM)。 而安全功能实际上整合了SIEM线程探测(SIEM threat detection features),端点保护(endpoint prevention )和响应能力(response capabilities)。
1.1. 官方版本的区别
elastic stack免费版提供的安全功能是非常有限的,在官方文档中的描述叫核心安全功能,而收费的叫高级安全功能,请参考官方网站
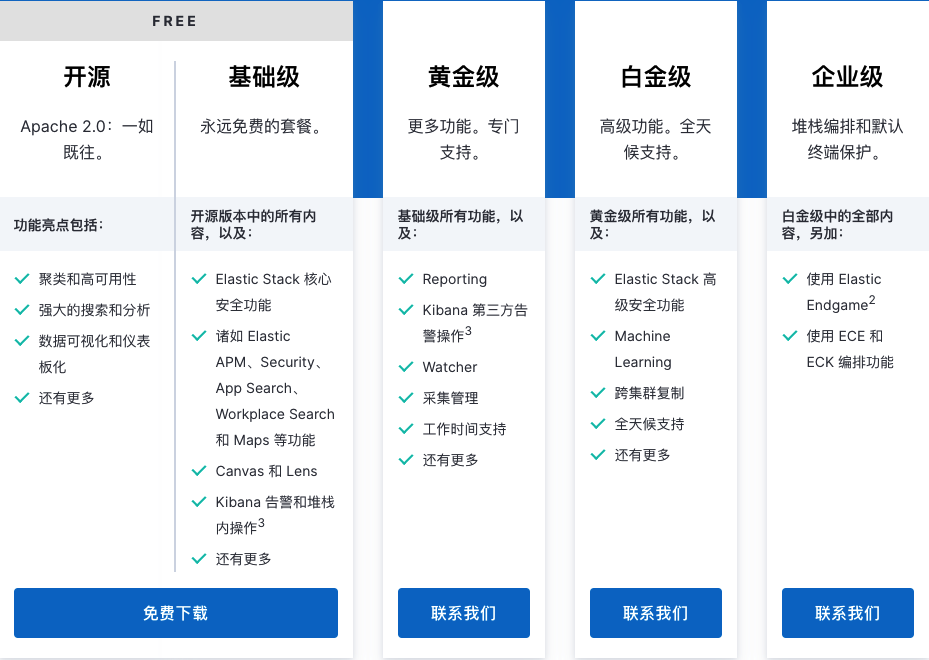
其实我觉得他已经把一些亮点都总结的很好了
- 基础级:免费
- 黄金级:亮点在于kibana的监控和报警功能
- 白金级:亮点在于安全功能,也就是x-pack的全套功能
- 企业级:所有功能
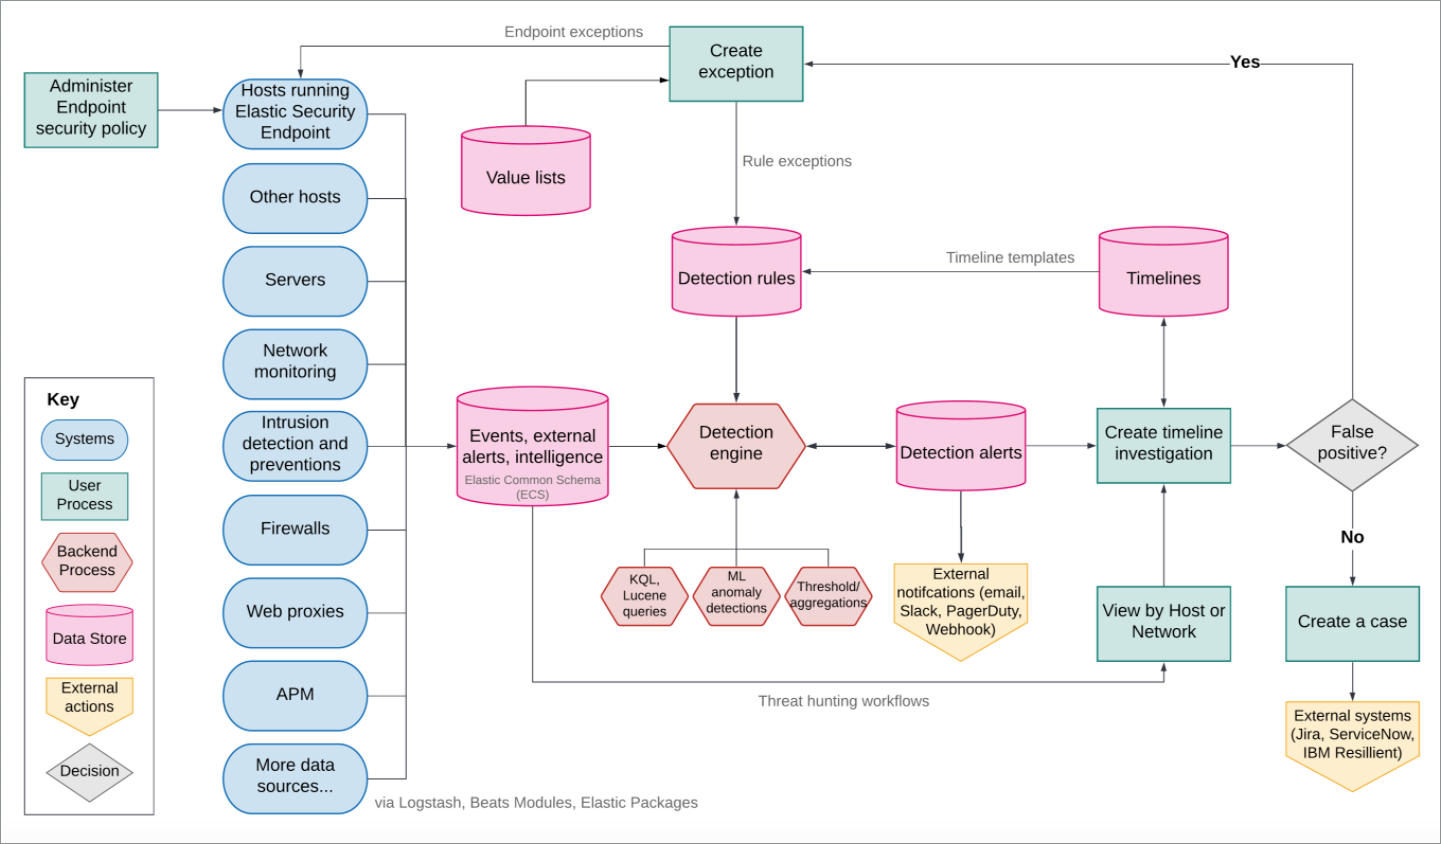
1.2. 安全组件的工作流
1. 开启安全认证
官方文档,在ES的7.x版本中,basic认证是免费的功能,我们只需要在elasticsearch的配置文件中添加下面的配置就可以了
# x-pack security configuration
xpack.security.enabled: true
xpack.license.self_generated.type: basic
但是,这样会启动不了,会报错
[1] bootstrap checks failed
[1]: Transport SSL must be enabled if security is enabled on a [basic] license. Please set [xpack.security.transport.ssl.enabled] to [true] or disable security by setting [xpack.security.enabled] to [false]
提示我们配置ssl
xpack.security.transport.ssl.enabled: true
但是启动了ssl之后,需要我们生成证书
$ bin/elasticsearch-certutil ca
.
.
.
Please enter the desired output file [elastic-stack-ca.p12]:
Enter password for elastic-stack-ca.p12 :
ca证书的生成位置在/usr/share/elasticsearch/elastic-stack-ca.p12,然后通过这个ca签署证书
elasticsearch-certutil cert --ca /usr/share/elasticsearch/elastic-stack-ca.p12
.
.
.
Enter password for CA (/usr/share/elasticsearch/elastic-stack-ca.p12) :
Please enter the desired output file [elastic-certificates.p12]:
Enter password for elastic-certificates.p12 :
# 证书生成的位置
Certificates written to /usr/share/elasticsearch/elastic-certificates.p12
我们把证书放到配置文件目录/etc/elasticsearch/certs下面
mkdir /etc/elasticsearch/certs
mv /usr/share/elasticsearch/elastic-certificates.p12 /etc/elasticsearch/certs
最后,所以我们的配置文件最后是这个样子的
# x-pack security configuration
xpack.security.enabled: true
xpack.license.self_generated.type: basic
xpack.security.transport.ssl.enabled: true
xpack.security.transport.ssl.verification_mode: certificate
xpack.security.transport.ssl.keystore.path: /etc/elasticsearch/certs/elastic-certificates.p12
xpack.security.transport.ssl.truststore.path: /etc/elasticsearch/certs/elastic-certificates.p12
由于我刚才在生成证书的时候还配置了密码,所以还需要执行下面的命令(如果生成证书的时候没有密码,下面的就省略)
elasticsearch-keystore add xpack.security.transport.ssl.keystore.secure_password
elasticsearch-keystore add xpack.security.transport.ssl.truststore.secure_password
2. 配置用户
使用命令行配置默认的用户
elasticsearch-setup-passwords interactive
.
.
.
Changed password for user [apm_system]
Changed password for user [kibana_system]
Changed password for user [kibana]
Changed password for user [logstash_system]
Changed password for user [beats_system]
Changed password for user [remote_monitoring_user]
Changed password for user [elastic]
看名字就能知道是干什么的了吧
| 用户名 | 作用 |
|---|---|
| elastic | 超级用户 |
| apm_system | 给apm用的 |
| kibana_system | 负责kibana连接elasticsearch |
| kibana | 旧版本中使用的,马上要被废弃掉,使用kibana_system就好了 |
| logstash_system | 给logstash用的 |
| beats_system | 给各种beats用的 |
| remote_monitoring_user | 给metricsbeats用的 |
3. kibana配置
可以在配置文件中写密码,但是不太建议这么做
elasticsearch.username:
elasticsearch.password:
通常我们建议使用keystore,也就是kibana.keystore
kibana-keystore create --allow-root
kibana-keystore add elasticsearch.username --allow-root
kibana-keystore add elasticsearch.password --allow-root
# 删除
kibana-keystore remove xxx
再次登录kibana界面,使用elastic用户进入控制台就好了
4. 配置Elasticsearch和kibana的ssl/tls通信
官方文档,我们需要对es的api进行https加密,使用下面的命令,通过向导来生成证书
./bin/elasticsearch-certutil http
按照下面的要求来做
-
When asked if you want to generate a CSR, enter
n. -
When asked if you want to use an existing CA, enter
y. -
Enter the path to your CA. This is the absolute path to the
elastic-stack-ca.p12file that you generated for your cluster. -
Enter the password for your CA.
-
Enter an expiration value for your certificate. You can enter the validity period in years, months, or days. For example, enter
90Dfor 90 days. -
When asked if you want to generate one certificate per node, enter
y.Each certificate will have its own private key, and will be issued for a specific hostname or IP address.
-
When prompted, enter the name of the first node in your cluster. Use the same node name that you used when generating node certificates.
-
Enter all hostnames used to connect to your first node. These hostnames will be added as DNS names in the Subject Alternative Name (SAN) field in your certificate.
List every hostname and variant used to connect to your cluster over HTTPS.
-
Enter the IP addresses that clients can use to connect to your node.
-
Repeat these steps for each additional node in your cluster.
最后会生成一个elasticsearch-ssl-http.zip。解压他就可以找到证书了,他包含了es和kibana的证书
/elasticsearch
|_ README.txt
|_ http.p12
|_ sample-elasticsearch.yml
/kibana
|_ README.txt
|_ elasticsearch-ca.pem
|_ sample-kibana.yml
我们把配置文件修改一下,加入下面两行
xpack.security.http.ssl.enabled: true
xpack.security.http.ssl.keystore.path: http.p12
启动es就可以了,同时,让kibana忽略证书
elasticsearch.hosts: ["https://localhost:9200"]
elasticsearch.ssl.verificationMode: none