Learning Objectives
By the end of this chapter, you should be able to:
- Discuss the difference between an Ingress Controller and a Service.
- Learn about nginx and GCE Ingress Controllers.
- Deploy an Ingress Controller.
- Configure an Ingress Rule.
INGRESS
Overview
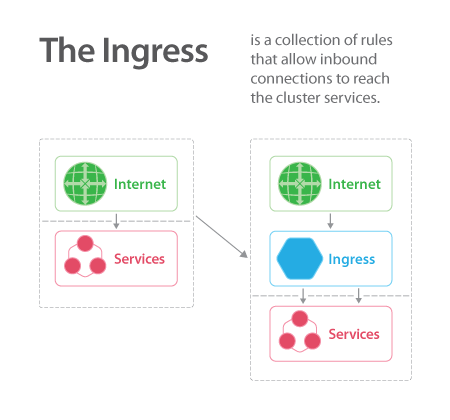
In an earlier chapter, we learned about using a Service to expose a containerized application outside of the cluster. We use Ingress Controllers and Rules to do the same function. The difference is efficiency. Instead of using lots of services, such as LoadBalancer, you can route traffic based on the request host or path. This allows for centralization of many services to a single point.
An Ingress Controller is different than most controllers, as it does not run as part of the kube-controller-manager binary. You can deploy multiple controllers, each with unique configurations. A controller uses Ingress Rules to handle traffic to and from outside the cluster.
There are many ingress controllers such as GKE, nginx, Traefik, Contour and Envoy to name a few. Any tool capable of reverse proxy should work. These agents consume rules and listen for associated traffic. An Ingress Rule is an API resource that you can create with kubectl. When you create that resource, it reprograms and reconfigures your Ingress Controller to allow traffic to flow from the outside to an internal service. You can leave a service as a ClusterIP type and define how the traffic gets routed to that internal service using an Ingress Rule.
Ingress Controller
An Ingress Controller is a daemon running in a Pod which watches the /ingresses endpoint on the API server, which is found under the networking.k8s.io/v1beta1 group for new objects. When a new endpoint is created, the daemon uses the configured set of rules to allow inbound connection to a service, most often HTTP traffic. This allows easy access to a service through an edge router to Pods, regardless of where the Pod is deployed.
Multiple Ingress Controllers can be deployed. Traffic should use annotations to select the proper controller. The lack of a matching annotation will cause every controller to attempt to satisfy the ingress traffic.

The Ingress Controller for Inbound Connections
nginx
Deploying an nginx controller has been made easy through the use of provided YAML files, which can be found in the ingress-nginx/deploy GitHub repository.
This page has configuration files to configure nginx on several platforms, such as AWS, GKE, Azure, and bare metal, among others.
As with any Ingress Controller, there are some configuration requirements for proper deployment. Customization can be done via a ConfigMap, Annotations, or, for detailed configuration, a custom template:
- Easy integration with RBAC
- Uses the annotation kubernetes.io/ingress.class: “nginx”
- L7 traffic requires the proxy-real-ip-cidr setting
- Bypasses kube-proxy to allow session affinity
- Does not use conntrack entries for iptables DNAT
- TLS requires the host field to be defined.
Google Load Balancer Controller (GLBC)
There are several objects which need to be created to deploy the GCE Ingress Controller. YAML files are available to make the process easy. Be aware that several objects would be created for each service, and currently, quotas are not evaluated prior to creation.
The GLBC Controller must be created and started first. Also, you must create a ReplicationController with a single replica, three services for the application Pod, and an Ingress with two hostnames and three endpoints for each service. The backend is a group of virtual machine instances, Instance Group.
Each path for traffic uses a group of like objects referred to as a pool. Each pool regularly checks the next hop up to ensure connectivity.
The multi-pool path is:
Global Forwarding Rule -> Target HTTP Proxy -> URL map -> Backend Service -> Instance Group
Currently, the TLS Ingress only supports port 443 and assumes TLS termination. It does not support SNI, only using the first certificate. The TLS secret must contain keys named tls.crt and tls.key.
Ingress API Resources
Ingress objects are now part of the networking.k8s.io API, but still a beta object. A typical Ingress object that you can POST to the API server is:
apiVersion: networking.k8s.io/v1beta1
kind: Ingress
metadata:
  name: ghost
spec:
  rules:
    - host: ghost.192.168.99.100.nip.io
http:
paths:
    - backend:
            serviceName: ghost
            servicePort: 2368
You can manage ingress resources like you do pods, deployments, services etc:
$ kubectl get ingress

$ kubectl delete ingress <ingress_name>

$ kubectl edit ingress <ingress_name>
Deploying the Ingress Controller
To deploy an Ingress Controller, it can be as simple as creating it with kubectl. The source for a sample controller deployment is available on GitHub.
$ kubectl create -f backend.yaml
The result will be a set of pods managed by a replication controller and some internal services. You will notice a default HTTP backend which serves 404 pages.
$ kubectl get pods,rc,svc
NAME                               READY  STATUS   RESTARTS  AGE
po/default-http-backend-xvep8      1/1    Running  0         4m
po/nginx-ingress-controller-fkshm  1/1    Running  0         4m

NAME                     DESIRED  CURRENT  READY  AGE
rc/default-http-backend  1        1        0      4m

NAME                      CLUSTER-IP  EXTERNAL-IP  PORT(S)  AGE
svc/default-http-backend  10.0.0.212  <none>       80/TCP   4m
svc/kubernetes            10.0.0.1    <none>       443/TCP  77d
Creating an Ingress Rule
To get exposed with ingress quickly, you can go ahead and try to create a similar rule as mentioned on the previous page. First, start a ghost deployment and expose it with an internal ClusterIP service:
$ kubectl run ghost --image=ghost

$ kubectl expose deployments ghost --port=2368
With the deployment exposed and the Ingress rules in place, you should be able to access the application from outside the cluster.
apiVersion: networking.k8s.io/v1beta1
kind: Ingress
metadata:
    name: ghost
spec:
    rules:
    - host: ghost.192.168.99.100.nip.io
      http:
      paths:
      - backend:
            serviceName: ghost
            servicePort: 2368
Multiple Rules
On the previous page, we defined a single rule. If you have multiple services, you can define multiple rules in the same Ingress, each rule forwarding traffic to a specific service.
rules:
- host: ghost.192.168.99.100.nip.io
  http:
    paths:
    - backend:
        serviceName: ghost
        servicePort: 2368
- host: nginx.192.168.99.100.nip.io
  http:
    paths:
    - backend:
        serviceName: nginx
        servicePort: 80
Intelligent Connected Proxies
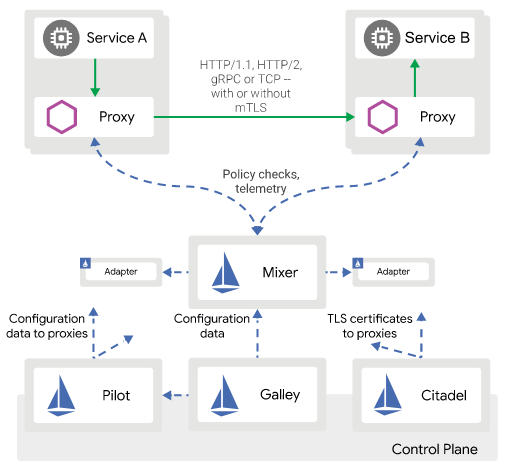
For more complex connections or resources such as service discovery, rate limiting, traffic management and advanced metrics, you may want to implement a service mesh.
A service mesh consists of edge and embedded proxies communicating with each other and handling traffic based on rules from a control plane. Various options are available, including Envoy, Istio, and linkerd.

Istio Service Mesh retrieved from the Istio Documentation
Service Mesh Options
-
Envoy
Envoy is a modular and extensible proxy favored due to its modular construction, open architecture and dedication to remaining unmonetized. It is often used as a data plane under other tools of a service mesh.
-
Istio
Istio is a powerful tool set which leverages Envoy proxies via a multi-component control plane. It is built to be platform-independent, and it can be used to make the service mesh flexible and feature-filled.
-
linkerd
linkerd is another service mesh, purposely built to be easy to deploy, fast, and ultralight.