Learning Objectives
By the end of this chapter, you should be able to:
- Understand the API REST-based architecture.
- Work with annotations.
- Understand a simple Pod template.
- Use kubectl with greater verbosity for troubleshooting.
- Separate cluster resources using namespaces.
APIS_AND_ACCESS
API Access
Kubernetes has a powerful REST-based API. The entire architecture is API-driven. Knowing where to find resource endpoints and understanding how the API changes between versions can be important to ongoing administrative tasks, as there is much ongoing change and growth. Starting with v1.16 deprecated objects are no longer honored by the API server.
As we learned in the Kubernetes Architecture chapter, the main agent for communication between cluster agents and from outside the cluster is the kube-apiserver. A curl query to the agent will expose the current API groups. Groups may have multiple versions, which evolve independently of other groups, and follow a domain-name format with several names reserved, such as single-word domains, the empty group, and any name ending in .k8s.io.
RESTful
kubectl makes API calls on your behalf, responding to typical HTTP verbs (GET, POST, DELETE). You can also make calls externally, using curl or other program. With the appropriate certificates and keys, you can make requests, or pass JSON files to make configuration changes.
$ curl --cert userbob.pem --key userBob-key.pem \
--cacert /path/to/ca.pem \
https://k8sServer:6443/api/v1/pods
The ability to impersonate other users or groups, subject to RBAC configuration, allows a manual override authentication. This can be helpful for debugging authorization policies of other users.
Checking Access
While there is more detail on security in a later chapter, it is helpful to check the current authorizations, both as an administrator, as well as another user. The following shows what user bob could do in the default namespace and the developer namespace, using the auth can-i subcommand to query:
$ kubectl auth can-i create deployments
yes

$ kubectl auth can-i create deployments --as bob
no

$ kubectl auth can-i create deployments --as bob --namespace developer
yes
There are currently three APIs which can be applied to set who and what can be queried:
-
SelfSubjectAccessReview Access review for any user, helpful for delegating to others.
-
LocalSubjectAccessReview Review is restricted to a specific namespace.
-
SelfSubjectRulesReview A review which shows allowed actions for a user within a particular namespace.
The use of reconcile allows a check of authorization necessary to create an object from a file. No output indicates the creation would be allowed.
Optimistic Concurrency
The default serialization for API calls must be JSON. There is an effort to use Google’s protobuf serialization, but this remains experimental. While we may work with files in a YAML format, they are converted to and from JSON.
Kubernetes uses the resourceVersion value to determine API updates and implement optimistic concurrency. In other words, an object is not locked from the time it has been read until the object is written.
Instead, upon an updated call to an object, the resourceVersion is checked, and a 409 CONFLICT is returned, should the number have changed. The resourceVersion is currently backed via the modifiedIndex parameter in the etcd database, and is unique to the namespace, kind, and server. Operations which do not change an object, such as WATCH or GET, do not update this value.
Using Annotations
Labels are used to work with objects or collections of objects; annotations are not.
Instead, annotations allow for metadata to be included with an object that may be helpful outside of the Kubernetes object interaction. Similar to labels, they are key to value maps. They are also able to hold more information, and more human-readable information than labels.
Having this kind of metadata can be used to track information such as a timestamp, pointers to related objects from other ecosystems, or even an email from the developer responsible for that object’s creation.
The annotation data could otherwise be held in an exterior database, but that would limit the flexibility of the data. The more this metadata is included, the easier it is to integrate management and deployment tools or shared client libraries.
For example, to annotate only Pods within a namespace, you can overwrite the annotation, and finally delete it:
$ kubectl annotate pods --all description='Production Pods' -n prod

$ kubectl annotate --overwrite pods description="Old Production Pods" -n prod

$ kubectl annotate pods foo description- -n prod
Simple Pod
As discussed earlier, a Pod is the lowest compute unit and individual object we can work with in Kubernetes. It can be a single container, but often, it will consist of a primary application container and one or more supporting containers.
Below is an example of a simple pod manifest in YAML format. You can see the apiVersion (it must match the existing API group), the kind (the type of object to create), the metadata (at least a name), and its spec (what to create and parameters), which define the container that actually runs in this pod:
apiVersion: v1
kind: Pod
metadata:
    name: firstpod
spec:
    containers:
    - image: nginx
      name: stan
You can use the kubectl create command to create this pod in Kubernetes. Once it is created, you can check its status with kubectl get pods. The output is omitted to save space:
$ kubectl create -f simple.yaml

$ kubectl get pods

$ kubectl get pod firstpod -o yaml

$ kubectl get pod firstpod -o json
Manage API Resources with kubectl
Kubernetes exposes resources via RESTful API calls, which allows all resources to be managed via HTTP, JSON or even XML, the typical protocol being HTTP. The state of the resources can be changed using standard HTTP verbs (e.g. GET, POST, PATCH, DELETE, etc.).
kubectl has a verbose mode argument which shows details from where the command gets and updates information. Other output includes curl commands you could use to obtain the same result. While the verbosity accepts levels from zero to any number, there is currently no verbosity value greater than ten. You can check this out for kubectl get. The output below has been formatted for clarity:
$ kubectl --v=10 get pods firstpod

....
I1215 17:46:47.860958 29909 round_trippers.go:417]
curl -k -v -XGET -H "Accept: application/json"
-H "User-Agent: kubectl/v1.8.5 (linux/amd64) kubernetes/cce11c6"
https://10.128.0.3:6443/api/v1/namespaces/default/pods/firstpod
....
If you delete this pod, you will see that the HTTP method changes from XGET to XDELETE.
$ kubectl --v=10 delete pods firstpod

....
I1215 17:49:32.166115 30452 round_trippers.go:417]
curl -k -v -XDELETE -H "Accept: application/json, */*"
-H "User-Agent: kubectl/v1.8.5 (linux/amd64) kubernetes/cce11c6"
https://10.128.0.3:6443/api/v1/namespaces/default/pods/firstpod
....
Access from Outside the Cluster
The primary tool used from the command line will be kubectl, which calls curl on your behalf. You can also use the curl command from outside the cluster to view or make changes.
The basic server information, with redacted TLS certificate information, can be found in the output of
$ kubectl config view
If you view the verbose output from a previous page, you will note that the first line references a configuration file where this information is pulled from, ~/.kube/config:
I1215 17:35:46.725407 27695 loader.go:357]
     Config loaded from file /home/student/.kube/config
Without the certificate authority, key and certificate from this file, only insecure curl commands can be used, which will not expose much due to security settings. We will use curl to access our cluster using TLS in an upcoming lab.
~/.kube/config
Take a look at the output below:
apiVersion: v1
clusters:
- cluster:
    certificate-authority-data: LS0tLS1CRUdF.....
    server: https://10.128.0.3:6443
    name: kubernetes
contexts:
- context:
    cluster: kubernetes
    user: kubernetes-admin
  name: kubernetes-admin@kubernetes
current-context: kubernetes-admin@kubernetes
kind: Config
preferences: {}
users:
- name: kubernetes-admin
  user:
    client-certificate-data: LS0tLS1CRUdJTib.....
    client-key-data: LS0tLS1CRUdJTi....
The output above shows 19 lines of output, with each of the keys being heavily truncated. While the keys may look similar, close examination shows them to be distinct.
- apiVersion
As with other objects, this instructs the kube-apiserver where to assign the data.
- clusters
This key contains the name of the cluster, as well as where to send the API calls. The certificate-authority-data is passed to authenticate the curl request.
- contexts
This is a setting which allows easy access to multiple clusters, possibly as various users, from one configuration file. It can be used to set namespace, user, and cluster.
- current-context
This shows which cluster and user the kubectl command would use. These settings can also be passed on a per-command basis.
- kind
Every object within Kubernetes must have this setting; in this case, a declaration of object type Config.
- preferences
Currently not used, this is an optional settings for the kubectl command, such as colorizing output.
- users
A nickname associated with client credentials, which can be client key and certificate, username and password, and a token. Token and username/password are mutually exclusive. These can be configured via the kubectl config set-credentials command.
Working with Namespaces
Take a look at the following commands:
$ kubectl get ns

$ kubectl create ns linuxcon

$ kubectl describe ns linuxcon

$ kubectl get ns/linuxcon -o yaml

$ kubectl delete ns/linuxcon
The above commands show how to view, create and delete namespaces. Note that the describe subcommand shows several settings, such as Labels, Annotations, resource quotas, and resource limits, which we will discus later in the course.
Once a namespace has been created, you can reference it via YAML when creating a resource:
$ cat redis.yaml

apiVersion: V1
kind: Pod
metadata:
    name: redis
    namespace: linuxcon
...
API Resources with kubectl
All API resources exposed are available via kubectl. To get more information, do kubectl help.
kubectl [command] [type] [Name] [flag]
Expect the list below to change:
| all | events (ev) | podsecuritypolicies (psp) |
|---|---|---|
| certificatesigningrequests (csr) | horizontalpodautoscalers (hpa) | podtemplates |
| clusterrolebindings | ingresses (ing) | replicasets (rs) |
| clusterroles | jobs | replicationcontrollers (rc) |
| clusters (valid only for federation apiservers) | limitranges (limits) | resourcequotas (quota) |
| componentstatuses (cs) | namespaces (ns) | rolebindings |
| configmaps (cm) | networkpolicies (netpol) | roles |
| controllerrevisions | nodes (no) | secrets |
| cronjobs | persistentvolumeclaims (pvc) | serviceaccounts (sa) |
| customresourcedefinition (crd) | persistentvolumes (pv) | services (svc) |
| daemonsets (ds) | poddisruptionbudgets (pdb) | statefulsets |
| deployments (deploy) | podpreset | storageclasses |
| endpoints (ep) | pods (po) |
Additional Resource Methods
In addition to basic resource management via REST, the API also provides some extremely useful endpoints for certain resources.
For example, you can access the logs of a container, exec into it, and watch changes to it with the following endpoints:
$ curl --cert /tmp/client.pem --key /tmp/client-key.pem \
--cacert /tmp/ca.pem -v -XGET \
https://10.128.0.3:6443/api/v1/namespaces/default/pods/firstpod/log
This would be the same as the following. If the container does not have any standard out, there would be no logs.
$ kubectl logs firstpod
There are other calls you could make, following the various API groups on your cluster:
GET /api/v1/namespaces/{namespace}/pods/{name}/exec

GET /api/v1/namespaces/{namespace}/pods/{name}/log

GET /api/v1/watch/namespaces/{namespace}/pods/{name}
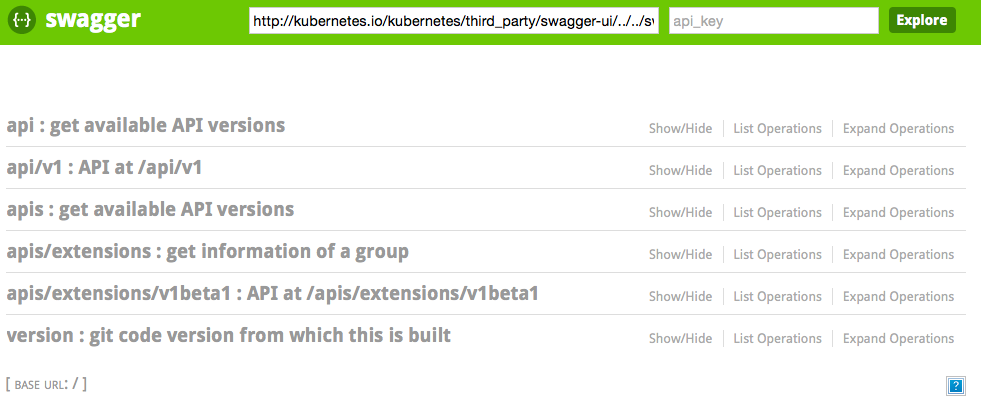
Swagger and OpenAPI
The entire Kubernetes API uses a Swagger specification. This is evolving towards the OpenAPI initiative. It is extremely useful, as it allows, for example, to auto-generate client code. All the stable resources definitions are available on the documentation site.
You can browse some of the API groups via a Swagger UI on the OpenAPI Specification web page.
API Maturity
The use of API groups and different versions allows for development to advance without changes to an existing group of APIs. This allows for easier growth and separation of work among separate teams. While there is an attempt to maintain some consistency between API and software versions, they are only indirectly linked.
The use of JSON and Google’s Protobuf serialization scheme will follow the same release guidelines.
- Alpha
An Alpha level release, noted with alpha in the name, may be buggy and is disabled by default. Features could change or disappear at any time. Only use these features on a test cluster which is often rebuilt.
- Beta
The Beta level, found with beta in the name, has more well-tested code and is enabled by default. It also ensures that, as changes move forward, they will be tested for backwards compatibility between versions. It has not been adopted and tested enough to be called stable. You can expect some bugs and issues.
- Stable
Use of the Stable version, denoted by only an integer which may be preceded by the letter v, is for stable APIs.