Learning Objectives
By the end of this chapter, you should be able to:
- Examine easy Kubernetes deployments using the Helm package manager.
- Understand the Chart template used to describe what application to deploy.
- Discuss how Tiller creates the Deployment based on the Chart.
- Initialize Helm in a cluster.
HELM
Deploying Complex Applications
We have used Kubernetes tools to deploy simple Docker applications. Starting with the v1.4 release, the goal was to have a canonical location for software. Helm is similar to a package manager like yum or apt, with a chart being similar to a package. Helm v3 is significantly different than v2.
A typical containerized application will have several manifests. Manifests for deployments, services, and ConfigMaps. You will probably also create some secrets, Ingress, and other objects. Each of these will need a manifest.
With Helm, you can package all those manifests and make them available as a single tarball. You can put the tarball in a repository, search that repository, discover an application, and then, with a single command, deploy and start the entire application.
The server runs in your Kubernetes cluster, and your client is local, even a local laptop. With your client, you can connect to multiple repositories of applications.
You will also be able to upgrade or roll back an application easily from the command line.
Helm v2 and Tiller
The helm tool packages a Kubernetes application using a series of YAML files into a chart, or package. This allows for simple sharing between users, tuning using a templating scheme, as well as provenance tracking, among other things.
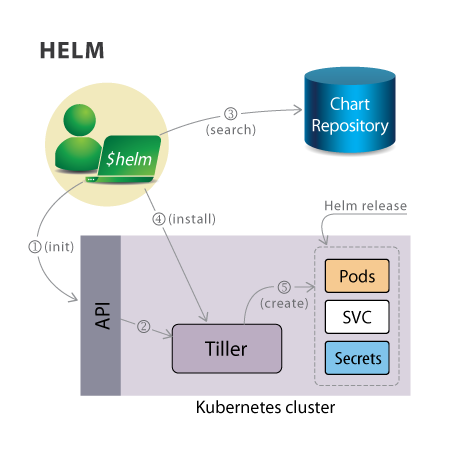
Basic Helm and Tiller Flow
Helm v2 is made of two components:
- A server called Tiller, which runs inside your Kubernetes cluster.
- A client called Helm, which runs on your local machine.
Helm version 2 uses a Tiller pod to deploy in the cluster. This has led to a lot of issues with security and cluster permissions. The new Helm v3 does not deploy a pod.
With the Helm client you can browse package repositories (containing published Charts), and deploy those Charts on your Kubernetes cluster. The Helm will download the chart and pass a request to Tiller to create a release, otherwise known as an instance of a chart. The release will be made of various resources running in the Kubernetes cluster.
Helm v3
With the near complete overhaul of Helm, the processes and commands have changed quite a bit. Expect to spend some time updating and integrating these changes if you are currently using Helm v2.
One of the most noticeable changes is the removal of the Tiller pod. This was an ongoing security issue, as the pod needed elevated permissions to deploy charts. The functionality is in the command alone, and no longer requires initialization to use.
In version 2, an update to a chart and deployment used a 2-way strategic merge for patching. This compared the previous manifest to the intended manifest, but not the possible edits done outside of helm commands. The third way now checked is the live state of objects.
Among other changes, software installation no longer generates a name automatically. One must be provided, or the –generated-name option must be passed.
Chart Contents
A chart is an archived set of Kubernetes resource manifests that make up a distributed application. You can learn more from the Helm 3 documentation. Others exist and can be easily created, for example by a vendor providing software. Charts are similar to the use of independent YUM repositories.
├── Chart.yaml ├── README.md ├── templates │ ├── NOTES.txt │ ├── _helpers.tpl │ ├── configmap.yaml │ ├── deployment.yaml │ ├── pvc.yaml │ ├── secrets.yaml │ └── svc.yaml └── values.yaml
- Chart.yaml
The Chart.yaml file contains some metadata about the Chart, like its name, version, keywords, and so on, in this case, for MariaDB.
- values.yaml
The values.yaml file contains keys and values that are used to generate the release in your cluster. These values are replaced in the resource manifests using the Go templating syntax.
- templates
The templates directory contains the resource manifests that make up this MariaDB application.
Templates
The templates are resource manifests that use the Go templating syntax. Variables defined in the values file, for example, get injected in the template when a release is created. In the MariaDB example we provided, the database passwords are stored in a Kubernetes secret, and the database configuration is stored in a Kubernetes ConfigMap.
We can see that a set of labels are defined in the Secret metadata using the Chart name, Release name, etc. The actual values of the passwords are read from the values.yaml file.
apiVersion: v1
kind: Secret
metadata:
    name:
    labels:
        app:
        chart: "-"
        release: ""
        heritage: ""
type: Opaque
data:
    mariadb-root-password:
    mariadb-password:
Initializing Helm v2
Helm v3 does not need to be initialized.
As always, you can build Helm from source, or download a tarball. We expect to see Linux packages for the stable release soon. The current RBAC security requirements to deploy helm require the creation of a new serviceaccount and assigning of permissions and roles. There are several optional settings which can be passed to the helm init command, typically for particular security concerns, storage options and also a dry-run option.
$ helm init
...
Tiller (the helm server side component) has been installed into your Kubernetes Cluster.
Happy Helming!

$ kubectl get deployments --namespace=kube-system
NAMESPACE    NAME           READY  UP-TO-DATE  AVAILABLE  AGE
kube-system  tiller-deploy  1/1    1           1          15s
The helm v2 initialization should have created a new tiller-deploy pod in your cluster. Please note that this will create a deployment in the kube-system namespace.
The client will be able to communicate with the tiller pod using port forwarding. Hence, you will not see any service exposing tiller.
Chart Repositories
A default repository is included when initializing helm, but it’s common to add other repositories. Repositories are currently simple HTTP servers that contain an index file and a tarball of all the Charts present.
You can interact with a repository using the helm repo commands.
$ helm repo add testing http://storage.googleapis.com/kubernetes-charts-testing

$ helm repo list
NAME URL
stable http://storage.googleapis.com/kubernetes-charts
local http://localhost:8879/charts
testing http://storage.googleapis.com/kubernetes-charts...
Once you have a repository available, you can search for Charts based on keywords. Below, we search for a redis Chart:
$ helm search redis
WARNING: Deprecated index file format. Try 'helm repo update'
NAME                     VERSION DESCRIPTION
testing/redis-cluster    0.0.5   Highly available Redis cluster with multiple se...
testing/redis-standalone 0.0.1   Standalone Redis Master testing/...
Once you find the chart within a repository, you can deploy it on your cluster.
Deploying a Chart
To deploy a Chart, you can just use the helm install command. There may be several required resources for the installation to be successful, such as available PVs to match chart PVC. Currently, the only way to discover which resources need to exist is by reading the READMEs for each chart :
$ helm install testing/redis-standalone
Fetched testing/redis-standalone to redis-standalone-0.0.1.tgz
amber-eel
Last Deployed: Fri Oct 21 12:24:01 2016
Namespace: default
Status: DEPLOYED

Resources:
==> v1/ReplicationController
NAME             DESIRED CURRENT READY AGE
redis-standalone 1       1       0     1s

==> v1/Service
NAME  CLUSTER-IP EXTERNAL-IP PORT(S)  AGE
redis 10.0.81.67 <none>      6379/TCP 0s
You will be able to list the release, delete it, even upgrade it and roll back.
$ helm list
NAME      REVISION UPDATED                  STATUS   CHART
amber-eel 1        Fri Oct 21 12:24:01 2016 DEPLOYED redis-standalone-0.0.1
A unique, colorful name will be created for each helm instance deployed. You can also use kubectl to view new resources Helm created in your cluster.
The output of the deployment should be carefully reviewed. It often includes information on access to the applications within. If your cluster did not have a required cluster resource, the output is often the first place to begin troubleshooting.