Learning Objectives
By the end of this chapter, you should be able to:
- Discuss the main components of a Kubernetes cluster.
- Learn details of the master agent kube-apiserver.
- Explain how the etcd database keeps the cluster state and configuration.
- Study the kubelet local agent.
- Examine how controllers are used to manage the cluster state.
- Discover what a Pod is to the cluster.
- Examine network configurations of a cluster.
- Discuss Kubernetes services.
Kubernetes Architecture
Kubernetes has the following main components:
- Master and worker nodes
- Controllers
- Services
- Pods of containers
- Namespaces and quotas
- Network and policies
- Storage.
A Kubernetes cluster is made of a master node and a set of worker nodes. The cluster is all driven via API calls to controllers, both interior as well as exterior traffic. We will take a closer look at these components next.
Most of the processes are executed inside a container. There are some differences, depending on the vendor and the tool used to build the cluster.

Kubernetes Architecture Retrieved from the Kubernetes documentation - Concepts Underlying the Cloud Controller Manager
Master Node
The Kubernetes master runs various server and manager processes for the cluster. Among the components of the master node are the kube-apiserver, the kube-scheduler, and the etcd database. As the software has matured, new components have been created to handle dedicated needs, such as the cloud-controller-manager; it handles tasks once handled by the kube-controller-manager to interact with other tools, such as Rancher or DigitalOcean for third-party cluster management and reporting.
There are several add-ons which have become essential to a typical production cluster, such as DNS services. Others are third-party solutions where Kubernetes has not yet developed a local component, such as cluster-level logging and resource monitoring.
kube-apiserver
The kube-apiserver is central to the operation of the Kubernetes cluster. All calls, both internal and external traffic, are handled via this agent. All actions are accepted and validated by this agent, and it is the only connection to the etcd database. It validates and configures data for API objects, and services REST operations. As a result, it acts as a master process for the entire cluster, and acts as a frontend of the cluster’s shared state.
Starting as an alpha feature in v1.16 is the ability to separate user-initiated traffic from server-initiated traffic. Until these features are developed, most network plugins commingle the traffic, which has performance, capacity, and security ramifications.
kube-scheduler
The kube-scheduler uses an algorithm to determine which node will host a Pod of containers. The scheduler will try to view available resources (such as volumes) to bind, and then try and retry to deploy the Pod based on availability and success. There are several ways you can affect the algorithm, or a custom scheduler could be used instead. You can also bind a Pod to a particular node, though the Pod may remain in a pending state due to other settings. One of the first settings referenced is if the Pod can be deployed within the current quota restrictions. If so, then the taints and tolerations, and labels of the Pods are used along with those of the nodes to determine the proper placement.
The details of the scheduler can be found on GitHub.
etcd
The state of the cluster, networking, and other persistent information is kept in an etcd database, or, more accurately, a b+tree key-value store. Rather than finding and changing an entry, values are always appended to the end. Previous copies of the data are then marked for future removal by a compaction process. It works with curl and other HTTP libraries, and provides reliable watch queries.
Simultaneous requests to update a value all travel via the kube-apiserver, which then passes along the request to etcd in a series. The first request would update the database. The second request would no longer have the same version number, in which case the kube-apiserver would reply with an error 409 to the requester. There is no logic past that response on the server side, meaning the client needs to expect this and act upon the denial to update.
There is a master database along with possible followers. They communicate with each other on an ongoing basis to determine which will be master, and determine another in the event of failure. While very fast and potentially durable, there have been some hiccups with new tools, such as kubeadm, and features like whole cluster upgrades.
Other Agents
The kube-controller-manager is a core control loop daemon which interacts with the kube-apiserver to determine the state of the cluster. If the state does not match, the manager will contact the necessary controller to match the desired state. There are several controllers in use, such as endpoints, namespace, and replication. The full list has expanded as Kubernetes has matured.
Remaining in beta in v1.16, the cloud-controller-manager (ccm) interacts with agents outside of the cloud. It handles tasks once handled by kube-controller-manager. This allows faster changes without altering the core Kubernetes control process. Each kubelet must use the –cloud-provider-external settings passed to the binary. You can also develop your own ccm, which can be deployed as a daemonset as an in-tree deployment or as a free-standing out-of-tree installation. The cloud-controller-manager is an optional agent which takes a few steps to enable. You can learn more about the cloud-controller-manager online.
Worker Nodes
All worker nodes run the kubelet and kube-proxy, as well as the container engine, such as Docker or rkt. Other management daemons are deployed to watch these agents or provide services not yet included with Kubernetes.
The kubelet interacts with the underlying Docker Engine also installed on all the nodes, and makes sure that the containers that need to run are actually running. The kube-proxy is in charge of managing the network connectivity to the containers. It does so through the use of iptables entries. It also has the userspace mode, in which it monitors Services and Endpoints using a random port to proxy traffic and an alpha feature of ipvs.
You can also run an alternative to the Docker engine: cri-o or rkt. To learn how you can do that, you should check the documentation. In future releases, it is highly likely that Kubernetes will support additional container runtime engines.
Supervisord is a lightweight process monitor used in traditional Linux environments to monitor and notify about other processes. In the cluster, this daemon monitors both the kubelet and docker processes. It will try to restart them if they fail, and log events. While not part of a standard installation, some may add this monitor for added reporting.
Kubernetes does not have cluster-wide logging yet. Instead, another CNCF project is used, called Fluentd. When implemented, it provides a unified logging layer for the cluster, which filters, buffers, and routes messages.
Kubelet
The kubelet agent is the heavy lifter for changes and configuration on worker nodes. It accepts the API calls for Pod specifications (a PodSpec is a JSON or YAML file that describes a pod). It will work to configure the local node until the specification has been met.
Should a Pod require access to storage, Secrets or ConfigMaps, the kubelet will ensure access or creation. It also sends back status to the kube-apiserver for eventual persistence.
- Uses PodSpec
- Mounts volumes to Pod
- Downloads secrets
- Passes request to local container engine
- Reports status of Pods and node to cluster.
Kubelet calls other components such as the Topology Manager, which uses hints from other components to configure topology-aware resource assignments such as for CPU and hardware accelerators. As an alpha feature, it is not enabled by default.
Services
With every object and agent decoupled we need a flexible and scalable agent which connects resources together and will reconnect, should something die and a replacement is spawned. Each Service is a microservice handling a particular bit of traffic, such as a single NodePort or a LoadBalancer to distribute inbound requests among many Pods.
A Service also handles access policies for inbound requests, useful for resource control, as well as for security.
- Connect Pods together
- Expose Pods to Internet
- Decouple settings
- Define Pod access policy.
We can use a service to connect one pod to another, or to outside of the cluster.

Service Network
This graphic shows a pod with a primary container, App, with an optional sidecar Logger. Also seen is the pause container, which is used by the cluster to reserve the IP address in the namespace prior to starting the other pods. This container is not seen from within Kubernetes, but can be seen using docker and crictl.
This graphic also shows a ClusterIP which is used to connect inside the cluster, not the IP of the cluster. As the graphic shows, this can be used to connect to a NodePort for outside the cluster, an IngressController or proxy, or another ”backend” pod or pods.
Controllers
An important concept for orchestration is the use of controllers. Various controllers ship with Kubernetes, and you can create your own, as well. A simplified view of a controller is an agent, or Informer, and a downstream store. Using a DeltaFIFO queue, the source and downstream are compared. A loop process receives an obj or object, which is an array of deltas from the FIFO queue. As long as the delta is not of the type Deleted, the logic of the controller is used to create or modify some object until it matches the specification.
The Informer which uses the API server as a source requests the state of an object via an API call. The data is cached to minimize API server transactions. A similar agent is the SharedInformer; objects are often used by multiple other objects. It creates a shared cache of the state for multiple requests.
A Workqueue uses a key to hand out tasks to various workers. The standard Go work queues of rate limiting, delayed, and time queue are typically used.
The endpoints, namespace, and serviceaccounts controllers each manage the eponymous resources for Pods.
Pods
The whole point of Kubernetes is to orchestrate the lifecycle of a container. We do not interact with particular containers. Instead, the smallest unit we can work with is a Pod. Some would say a pod of whales or peas-in-a-pod. Due to shared resources, the design of a Pod typically follows a one-process-per-container architecture.
Containers in a Pod are started in parallel. As a result, there is no way to determine which container becomes available first inside a pod. The use of InitContainers can order startup, to some extent. To support a single process running in a container, you may need logging, a proxy, or special adapter. These tasks are often handled by other containers in the same pod.
There is only one IP address per Pod, for almost every network plugin. If there is more than one container in a pod, they must share the IP. To communicate with each other, they can either use IPC, the loopback interface, or a shared filesystem.
While Pods are often deployed with one application container in each, a common reason to have multiple containers in a Pod is for logging. You may find the term sidecar for a container dedicated to performing a helper task, like handling logs and responding to requests, as the primary application container may not have this ability. The term sidecar, like ambassador and adapter, does not have a special setting, but refers to the concept of what secondary pods are included to do.
Containers
While Kubernetes orchestration does not allow direct manipulation on a container level, we can manage the resources containers are allowed to consume.
In the resources section of the PodSpec you can pass parameters which will be passed to the container runtime on the scheduled node:
resources:
  limits:
    cpu: "1"
    memory: "4Gi"
  requests:
    cpu: "0.5"
    memory: "500Mi"
Another way to manage resource usage of the containers is by creating a ResourceQuota object, which allows hard and soft limits to be set in a namespace. The quotas allow management of more resources than just CPU and memory and allows limiting several objects.
A beta feature in v1.12 uses the scopeSelector field in the quota spec to run a pod at a specific priority if it has the appropriate priorityClassName in its pod spec.
Init Containers
Not all containers are the same. Standard containers are sent to the container engine at the same time, and may start in any order. LivenessProbes, ReadinessProbes, and StatefulSets can be used to determine the order, but can add complexity. Another option can be an Init container, which must complete before app containers can be started. Should the init container fail, it will be restarted until completion, without the app container running.
The init container can have a different view of the storage and security settings, which allows us to use utilities and commands that the application would not be allowed to use. Init containers can contain code or utilities that are not in an app. It also has an independent security from app containers.
The code below will run the init container until the ls command succeeds; then the database container will start.
spec:
  containers:
  - name: main-app
    image: databaseD
    - name: wait-fatabase
    image: busybox
    command: ['sh', '-c', 'until ls /db/dir ; do sleep 5; done; ']
Component Review
Now that we have seen some of the components, let’s take another look with some of the connections shown. Not all connections are shown in the diagram below. Note that all of the components are communicating with kube-apiserver. Only kube-apiserver communicates with the etcd database.
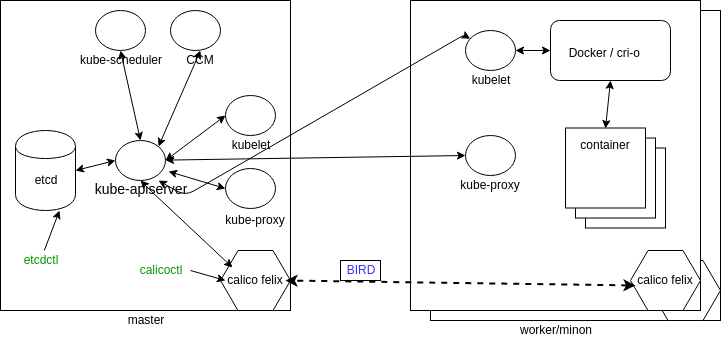
We also see some commands, which we may need to install separately to work with various components. There is an etcdctl command to interrogate the database and calicoctl to view more of how the network is configured. We can see Felix, which is the primary Calico agent on each machine. This agent, or daemon, is responsible for interface monitoring and management, route programming, ACL configuration and state reporting.
BIRD is a dynamic IP routing daemon used by Felix to read routing state and distribute that information to other nodes in the cluster. This allows a client to connect to any node, and eventually be connected to the workload on a container, even if not the node originally contacted.
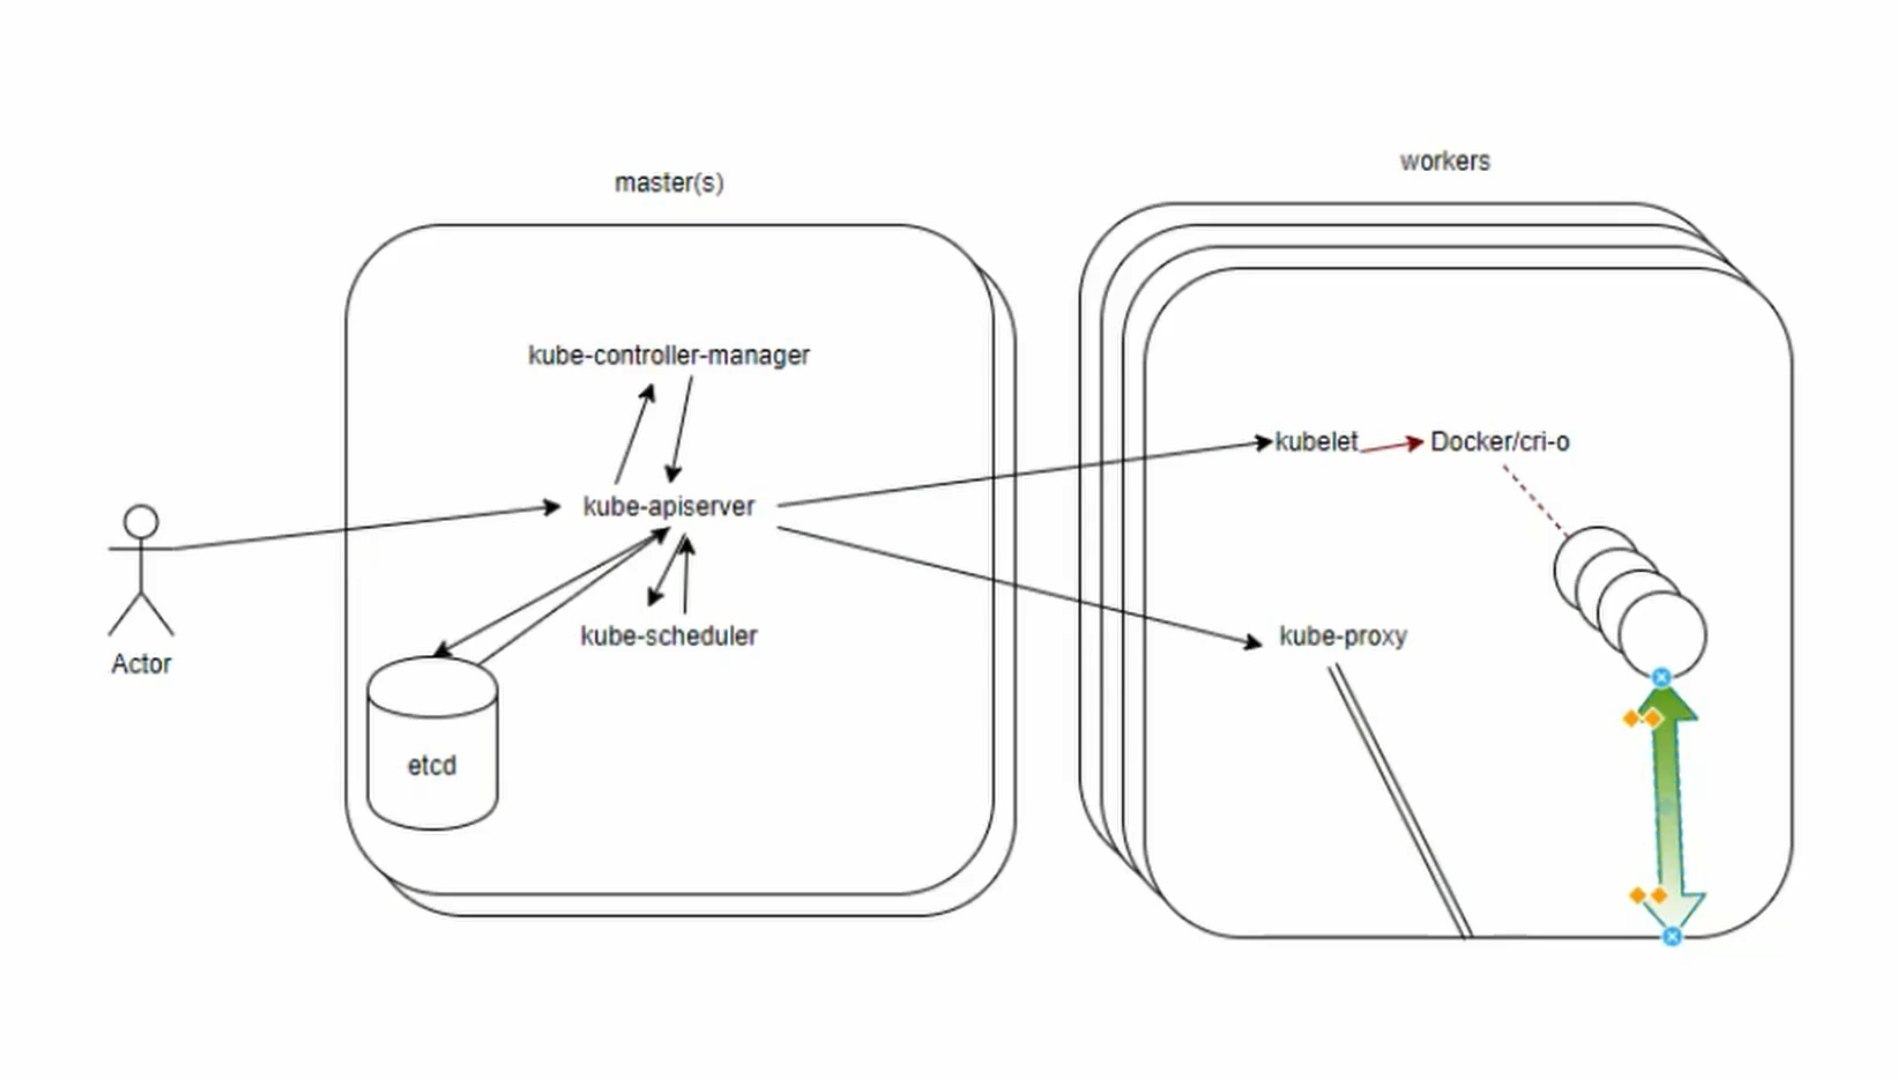
API Call Flow
Node
A node is an API object created outside the cluster representing an instance. While a master must be Linux, worker nodes can also be Microsoft Windows Server 2019. Once the node has the necessary software installed, it is ingested into the API server.
At the moment, you can create a master node with kubeadm init and worker nodes by passing join. In the near future, secondary master nodes and/or etcd nodes may be joined.
If the kube-apiserver cannot communicate with the kubelet on a node for 5 minutes, the default NodeLease will schedule the node for deletion and the NodeStatus will change from ready. The pods will be evicted once a connection is re-established. They are no longer forcibly removed and rescheduled by the cluster.
Each node object exists in the kube-node-lease namespace. To remove a node from the cluster, first use kubectl delete node ** to remove it from the API server. This will cause pods to be evacuated. Then, use **kubeadm reset to remove cluster-specific information. You may also need to remove iptables information, depending on if you plan on re-using the node.
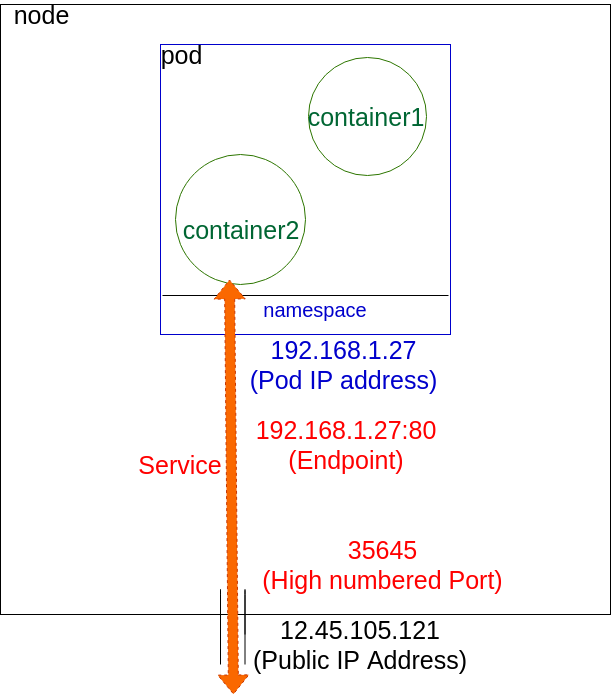
Single IP per Pod
A pod represents a group of co-located containers with some associated data volumes. All containers in a pod share the same network namespace.

Pod Network
The graphic shows a pod with two containers, A and B, and two data volumes, 1 and 2. Containers A and B share the network namespace of a third container, known as the pause container. The pause container is used to get an IP address, then all the containers in the pod will use its network namespace. Volumes 1 and 2 are shown for completeness.
To communicate with each other, containers within pods can use the loopback interface, write to files on a common filesystem, or via inter-process communication (IPC). There is now a network plugin from HPE Labs which allows multiple IP addresses per pod, but this feature has not grown past this new plugin.
Starting as an alpha feature in 1.16 is the ability to use IPv4 and IPv6 for pods and services. When creating a service, you would create the endpoint for each address family separately.
Container to Outside Path
This graphic shows a node with a single, dual-container pod. A NodePort service connects the Pod to the outside network.
Container Network
Even though there are two containers, they share the same namespace and the same IP address, which would be configured by kubectl working with kube-proxy. The IP address is assigned before the containers are started, and will be inserted into the containers. The container will have an interface like eth0@tun10. This IP is set for the life of the pod.
The endpoint is created at the same time as the service. Note that it uses the pod IP address, but also includes a port. The service connects network traffic from a node high-number port to the endpoint using iptables with ipvs on the way. The kube-controller-manager handles the watch loops to monitor the need for endpoints and services, as well as any updates or deletions.
Networking Setup
Getting all the previous components running is a common task for system administrators who are accustomed to configuration management. But, to get a fully functional Kubernetes cluster, the network will need to be set up properly, as well.
A detailed explanation about the Kubernetes networking model can be seen on the Cluster Networking page in the Kubernetes documentation.
If you have experience deploying virtual machines (VMs) based on IaaS solutions, this will sound familiar. The only caveat is that, in Kubernetes, the lowest compute unit is not a container, but what we call a pod.
A pod is a group of co-located containers that share the same IP address. From a networking perspective, a pod can be seen as a virtual machine of physical hosts. The network needs to assign IP addresses to pods, and needs to provide traffic routes between all pods on any nodes.
The three main networking challenges to solve in a container orchestration system are:
- Coupled container-to-container communication (solved by the pod concept).
- Pod-to-pod communication.
- External-to-pod communication (solved by the services concept, which we will discuss later).
Kubernetes expects the network configuration to enable pod-to-pod communication to be available; it will not do it for you.
Tim Hockin, one of the lead Kubernetes developers, has created a very useful slide deck to understand the Kubernetes networking: An Illustrated Guide to Kubernetes Networking.
CNI Network Configuration File
To provide container networking, Kubernetes is standardizing on the Container Network Interface (CNI) specification. Since v1.6.0, the goal of kubeadm (the Kubernetes cluster bootstrapping tool) has been to use CNI, but you may need to recompile to do so.
CNI is an emerging specification with associated libraries to write plugins that configure container networking and remove allocated resources when the container is deleted. Its aim is to provide a common interface between the various networking solutions and container runtimes. As the CNI specification is language-agnostic, there are many plugins from Amazon ECS, to SR-IOV, to Cloud Foundry, and more.
With CNI, you can write a network configuration file:
{
    "cniVersion": "0.2.0",
    "name": "mynet",
    "type": "bridge",
    "bridge": "cni0",
    "isGateway": true,
    "ipMasq": true,
    "ipam": {
        "type": "host-local",
        "subnet": "10.22.0.0/16",
        "routes": [
            { "dst": "0.0.0.0/0" }
             ]
     }
}
This configuration defines a standard Linux bridge named cni0, which will give out IP addresses in the subnet 10.22.0.0./16. The bridge plugin will configure the network interfaces in the correct namespaces to define the container network properly.
The main README of the CNI GitHub repository has more information.
Pod-to-Pod Communication
While a CNI plugin can be used to configure the network of a pod and provide a single IP per pod, CNI does not help you with pod-to-pod communication across nodes.
The requirement from Kubernetes is the following:
- All pods can communicate with each other across nodes.
- All nodes can communicate with all pods.
- No Network Address Translation (NAT).
Basically, all IPs involved (nodes and pods) are routable without NAT. This can be achieved at the physical network infrastructure if you have access to it (e.g. GKE). Or, this can be achieved with a software defined overlay with solutions like:
- Weave
- Flannel
- Calico
- Romana.
See this documentation page or the list of networking add-ons for a more complete list.
Mesos
At a high level, there is nothing different between Kubernetes and other clustering systems.
A central manager exposes an API, a scheduler places the workloads on a set of nodes, and the state of the cluster is stored in a persistent layer.
For example, you could compare Kubernetes with Mesos, and you would see the similarities. In Kubernetes, however, the persistence layer is implemented with etcd, instead of Zookeeper for Mesos.
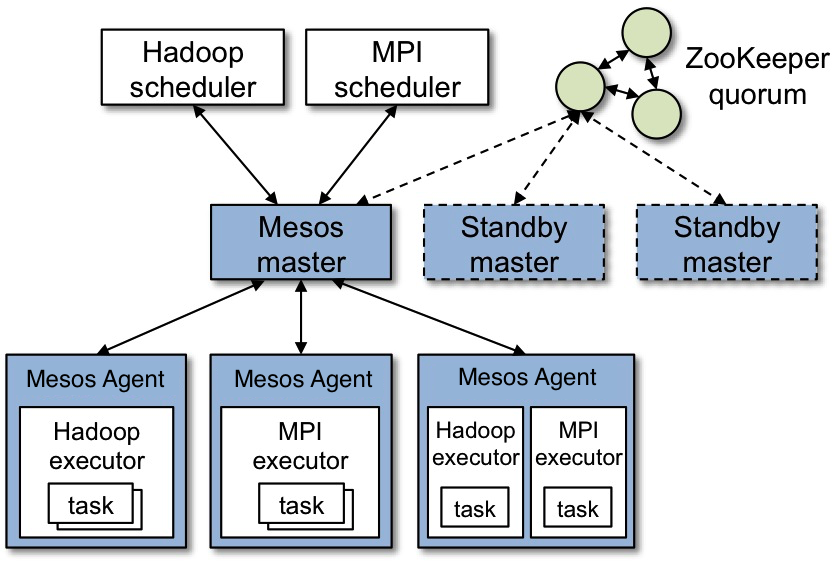
Mesos Architecture
The Apache Software Foundation Retrieved from the Mesos website
You should also consider systems like OpenStack and CloudStack. Think about what runs on their head node, and what runs on their worker nodes. How do they keep state? How do they handle networking? If you are familiar with those systems, Kubernetes will not seem that different.
What really sets Kubernetes apart is its features oriented towards fault-tolerance, self-discovery, and scaling, coupled with a mindset that is purely API-driven.